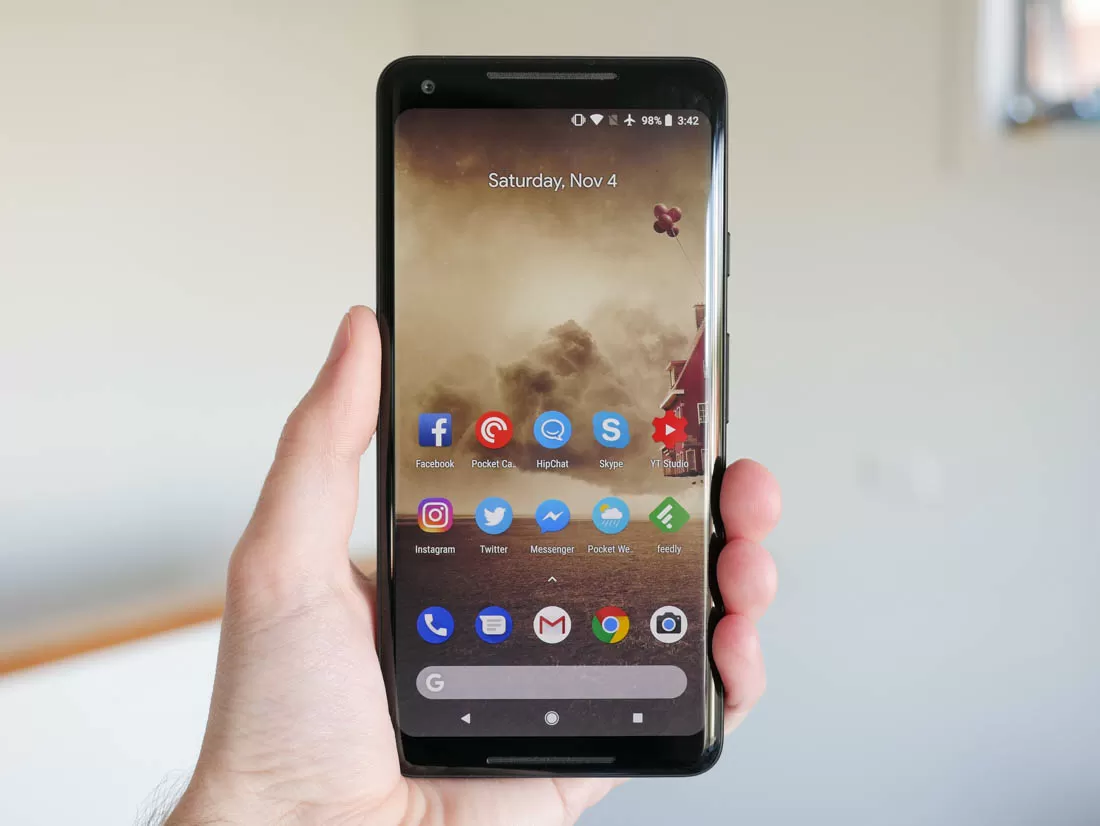
SMARTPHONES Google Pixel 2 XL
The Best Phones You Can Buy, From $200 to $1,000+

There has been no shortage of controversy around Google's latest phone, the Pixel 2 XL since it launched less than a month ago. While initial reviews painted the Pixel 2 line in a highly positive light, days later, the Pixel 2 XL’s display was dominating discussion around the internet. Problem after problem kept appearing, ranging from poor viewing angles to burn in, with Google scrambling to respond.
With the display blunder evolving at rapid pace and some kind of response expected at any moment, I decided to hold off on publishing my review of the Pixel 2 XL until the situation had settled. This also gave me more time to analyse the phone, in particular its display, and present my opinion based on facts. So if you want the full verdict on why the Pixel 2 XL’s display is not up to scratch, and what (if anything) can be improved with software, check out the display section further down this page.
But aside the phone’s display, there’s a lot of great technology packed into the Pixel 2 XL. This phone is genuinely close to being the perfect Android device that it’s painful to see its display holding it back from perfection. I still think that the Pixel 2 XL is a phone you should consider buying.
Let’s talk basics first.
The Pixel 2 XL has a 6.0-inch 1440 x 2880 p-OLED display with narrow bezels: the first and only phone in Google’s line-up with an impressive screen to body ratio. It’s powered, unsurprisingly, by the Snapdragon 835 SoC, 4GB of RAM and either 64 or 128 GB of internal storage. There’s a 12.2-megapixel camera on the rear with an f/1.8 lens and OIS, combined with an 8-megapixel sensor on the front. And the battery? 3520 mAh.
All this hardware has led to a very expensive smartphone, too. The Pixel 2 XL starts at $849 outright for the 64GB model, or a whopping $949 if you want the 128GB model. You’re essentially paying an extra $200 for the larger display, as the smaller Pixel 2 packs near-identical hardware for $649.
Design
On the design front, there’s no doubt the Pixel 2 XL is the best-looking handset ever released by Google. I thought last year’s Pixel was ugly, with fat bezels and an awkward glass slab on the rear. The Nexus 6P that came before it wasn’t much better. The Pixel 2 XL is a far more refined handset though.
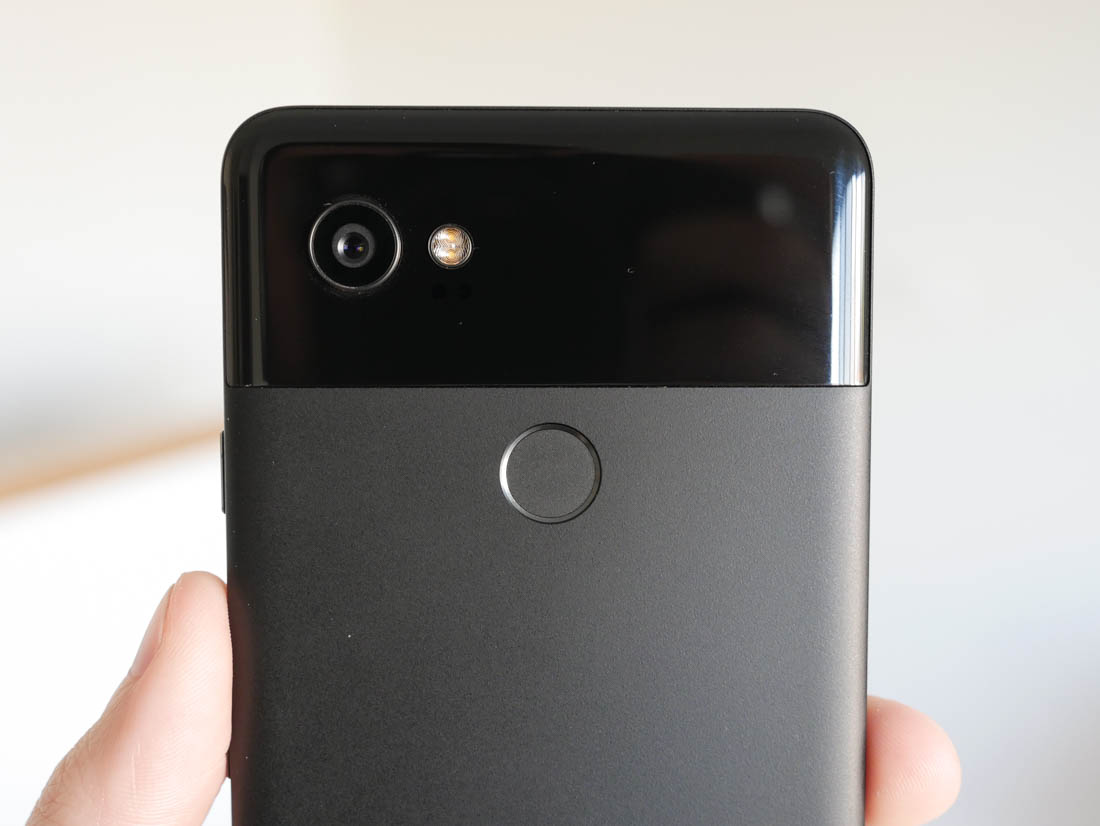
Yes, there is still the distinctive glass slab on the rear, but it’s much better integrated into the design. The metal body feels excellent in your hands, and the matte coating makes it easy to grip. The edges are rounded on all sides, the seams between glass and metal on the front are tight, and in general this phone fits in the hand well. Plus, it just has that premium touch with a pleasant, modern, minimalist aesthetic that fits with Google’s design strategy of late.
The Pixel 2 XL is reserved on the rear, but it’s all party on the front. The 6.0-inch 18:9 OLED occupies most of the usable space, with a decent 76.4% screen to body ratio. Google has ticked all the boxes from a design perspective and even though the bezels aren’t as small as competitors like the iPhone X and Galaxy Note 8, we like it.
As a stickler for detail, I did note the bezel is not even; it’s 8.5mm on the bottom, and 12mm on the top, which makes the display look misaligned on the front panel. It’s one of those things that you can’t unsee when you first see it, so a note to Google here: perfect symmetry is best.
On the positive side, Google (or is it LG?) managed to cram stereo front facing speakers into the chassis, which makes it great for content consumption and gaming. The speakers are loud and decent for a smartphone.
While Google has included front-facing speakers, they’ve removed the headphone jack, which I personally dislike. There is still no good reason why a phone can’t include both a 3.5mm audio jack and USB-C. You can still connect wireless headphones and USB-C headphones to a phone that has both USB-C and 3.5mm audio. Plus the whole USB-C to 3.5mm audio dongle situation is a garbage fire. I’m disappointed Google felt the need to make such a decision. Headphone ecosystem lock-in is becoming a real thing and that’s such a shame.
It's no surprise the Pixel 2 XL has a fingerprint sensor on the rear, which has been standard for Google’s last three phone generations. It’s in the perfect position for easy use and in my opinion trumps many other fingerprint unlock implementations or face identification technology at this stage.
The Pixel 2 XL is water resistant, which is another necessary inclusion. Water resistance is one of those features that is basically required for a top-end smartphone these days. Don’t use the Pixel 2 XL in saltwater though.
If you’re wondering about whether the Pixel 2 XL or Pixel 2 is easier to hold and use, that crown does go to the smaller Pixel 2. Despite this, I had no trouble holding or operating the Pixel 2 XL and its large display, even in one hand. The screen is expansive but the small bezel size assists with usability.
As for more minor concerns, the camera does protrude slightly from the body, which could make it prone to scratching after a lot of typical use. There’s no microSD expansion, which is typical of Google smartphones, though it would have been a nice inclusion considering adding an extra 64GB of internal storage costs $100.
Display: Hardware Issues
The most contentious aspect of the Pixel 2 XL is its display. Google has used an LG p-OLED panel (6.0", 2880 x 1440, 18:9 ratio), so it comes with all the associated benefits and issues with a taller aspect ratio. 16:9 videos, for example, will be shown with pillarboxing unless you zoom in the video. The good news is that most popular applications do a great job of supporting the extended aspect ratio these days.
Before discussing the issues with the Pixel 2 XL’s display, I wanted to touch on some of the more basic properties and the things Google did correctly. As we’re looking at OLED technology, the panel has essentially infinite contrast and deep blacks; deeper than any LCD can provide. The advantage is colors pop more than an LCD, and the display uses less power to produce blacks. On top of this, OLED panels are thinner, so the phones themselves can be thinner.
OLEDs also tend to have lower persistence and shorter pixel response times than LCDs, which makes them more suited to VR applications. Daydream VR is a key pillar of Google’s Android and Pixel strategies, so it made sense for them to go OLED.
In some aspects, the display is pretty similar to other OLEDs. Due to its high pixel density (538 ppi) it uses a diamond subpixel arrangement, which has lower ‘true’ detail than the RGB stripe used in LCDs. This isn’t a big deal at this sort of pixel density. Brightness is fairly typical as well, at 437 nits (100% APL). Samsung’s flagship phones push higher than this with their sunlight modes, but most other OLED smartphones do not and tend to fall around the acceptable 400 nit mark. The Pixel 2 XL is not hard to view outdoors.
What is clear, though, is that LG’s mobile OLED display technology is several generations behind Samsung, who is the market leader. There are several fundamental hardware issues with this panel – issues that Samsung has solved through years of tech refinement – which cannot be resolved through software updates.
Viewing the Pixel 2 XL straight on with a full white screen...
The first issue is the biggest: awful viewing angles. Even the slightest deviation produces a noticeable blue tint, such that you need to be viewing the display dead-on to receive an ideal experience. I’m not 100% sure whether this is an issue with the panel itself, or some other aspect to the display composition like a filter or other layer, but it’s a hardware problem, and it’s immediately obvious. Samsung solved this problem a long time ago, so LG needs to work hard to resolve this with their technology in the very next generation.
...and viewing it on an angle
Uniformity is an issue too. This isn’t something I normally discuss in any smartphone review, because most OLEDs and LCDs are relatively even. The Pixel 2 XL’s OLED has noticeable areas that are yellower/redder than others; on my review unit, the middle section is a slight too red relative to the top and bottom. This is most noticeable when the display is using a white background. I’ve seen some units that have worse uniformity than my display, too.
LG’s OLED technology is grainer than Samsung’s, too, which is a unique problem I haven’t seen with many LCDs either. The grain presents itself as a slight speckling, almost dust-like, across the entirety of the display. It’s most noticeable at a lower brightness and while viewing uniform white colors, like viewing the background of the Gmail or Twitter apps. Not as much of an issue in my opinion as the viewing angles or uniformity, but with the grain, the display doesn’t feel as crisp or clear as most other flagship phone displays.
The last hardware issue that has seen widespread reports is burn in/image retention. My unit started suffering from this after about 4 days of usage, and it’s only become worse after a few weeks. When viewing a full grey image, the outline of the navigation bar can clearly be seen. On the Pixel 2, which uses a Samsung OLED, burn in is practically invisible.
I tried to reduce the burn in using a range of techniques such as cycling through a range of colors for hours, but this only had a minor effect on the visibility of the burned in areas. I’ll have to see how this plays out over time, as the display will degrade further with more use. The good news is the latest software update from Google does include some techniques that will help mitigate the burn-in over time.
So what can you do about the Pixel 2 XL’s display hardware issues? Well, not much. These are all inherent issues with the hardware itself, so it’s not something that can be resolved entirely through software. I will say, though, that on day to day usage the only really noticeable issue is the poor viewing angles. Unless you are looking closely and trying to pick out specific problems, you won’t notice the uniformity and grain issues on a daily basis.
SMARTPHONES Google Pixel 2 XL
Intel HD Graphics Driver 26.20.100.7158 for Windows 10 64-bit
Installs the HD Graphics Driver for Windows 10 version, also works for Windows 8/7 64-bit.
This is the recommended driver for the early access release of the brand-new Intel® Graphics Command Center. If not already installed, this driver will add the Intel® Graphics Command Center to the system.
The Intel Graphics Command Center (IGCC) is a software interface that provides consumers a modern design to optimize their visual experience – built on community feedback, and designed for simplicity and ease of use:
IGCC scans for installed games to provide 1-click optimization of in-game settings based on the user’s hardware, and the ability to create custom game profiles to directly tune individual game settings.
Additionally, IGCC helps consumers understand graphics settings with simple explanations and before-and-after images to recognize how each setting will tax their hardware.
What's New:
Launch driver for:
- eFootball Pro Evolution Soccer 2020*
- Greedfall*
- 10th Gen Intel Core processors with UHD Graphics (“Comet Lake”)
Improvements:
- Enabling driver for Pro Evolution Soccer 2020*, Greedfall*, Children of Morta*, Spyro Reignited Trilogy*, and Pagan Online*.
- Performance optimizations for Age of Wonders: Planetfall*.
- OpenCL optimizations.
- More efficient content protection.
Developer highlights:
- Enabled reporting support for the following OpenGL 4.6 SPIR-V extensions:
- SPV_KHR_shader_ballot
- SPV_KHR_shader_draw_parameters
- SPV_KHR_storage_buffer_storage_class
- SPV_KHR_subgroup_vote
- Enabled the following Vulkan extensions:
- VK_EXT_fragment_shader_interlock
- VK_EXT_buffer_device address
- VK_EXT_separate_stencil_usage
- VK_KHR_uniform_buffer_standard_layout
Important Note:
These new drivers labeled as Windows DCH graphics drivers are not backward compatible with our previous graphics drivers that we're now labeling Legacy. This means if later you want to revert to a Legacy driver you will need to uninstall the driver via Windows Apps and Features and reboot the system before installing a Legacy driver. Failure to do so may result in minor to catastrophic issues on your system as well as system instability.
DO NOT use the INF / Have-Disk method to install or uninstall this driver as it bypasses the Intel installer designed to install these new drivers, thereby possibly resulting in minor to major system instability. For this reason, we're not providing the ZIP file for the next several driver releases while users transition to this new Microsoft driver platform.
Supported Products:
Hardware
All platforms with the following configurations are supported:
- 10th Gen Intel Core processors with UHD Graphics (“Comet Lake”)
- 7th Generation Intel Core processors with Intel Iris Plus Graphics 640/650
- 7th Generation Intel Core processors with Intel HD Graphics 610/615/620/630
- Intel Xeon processor E3-1500M v5 family with Intel HD Graphics P630
- Pentium Processors with Intel HD Graphics 610
- 6th Generation Intel Core processors with Intel Iris Pro Graphics 580
- 6th Generation Intel Core processors with Intel Iris Graphics 540/550
- 6th Generation Intel Core processors with Intel HD Graphics 520/530
- Intel Xeon processor E3-1500M v5 family with Intel HD Graphics P530
- Intel Xeon processor E3-1500M v5 family with Intel Iris Pro Graphics P580
- Intel Core M processors with Intel HD Graphics 515
- Pentium and Celeron Processors with Intel HD Graphics 500/505
- Pentium Processors with Intel HD Graphics 510
On 7th Generation Intel Core processors and related Pentium/Celeron:
- Microsoft Windows 10 64-bit
On 6th Generation Intel Core and Intel Mobile Xeon processors and related Pentium/Celeron:
- Microsoft Windows 10 64-bit
- Microsoft Windows 8.1* 64-bit
- Microsoft Windows 7* 64-bit
Support included but limited to the following chips:
- Intel Core i3-10110U Processor (4M Cache, up to 4.10 GHz)
- Intel Core i3-6006U Processor (3M Cache, 2.00 GHz)
- Intel Core i3-6098P Processor (3M Cache, 3.60 GHz)
- Intel Core i3-6100 Processor (3M Cache, 3.70 GHz)
- Intel Core i3-6100E Processor (3M Cache, 2.70 GHz)
- Intel Core i3-6100H Processor (3M Cache, 2.70 GHz)
- Intel Core i3-6100T Processor (3M Cache, 3.20 GHz)
- Intel Core i3-6100TE Processor (4M Cache, 2.70 GHz)
- Intel Core i3-6100U Processor (3M Cache, 2.30 GHz)
- Intel Core i3-6102E Processor (3M Cache, 1.90 GHz)
- Intel Core i3-6157U Processor (3M Cache, 2.40 GHz)
- Intel Core i3-6167U Processor (3M Cache, 2.70 GHz)
- Intel Core i3-6300 Processor (4M Cache, 3.80 GHz)
- Intel Core i3-6300T Processor (4M Cache, 3.30 GHz)
- Intel Core i3-6320 Processor (4M Cache, 3.90 GHz)
- Intel Core i3-7020U Processor (3M Cache, 2.30 GHz)
- Intel Core i3-7100 Processor (3M Cache, 3.90 GHz)
- Intel Core i3-7100E Processor (3M Cache, 2.90 GHz)
- Intel Core i3-7100H Processor (3M Cache, 3.00 GHz)
- Intel Core i3-7100T Processor (3M Cache, 3.40 GHz)
- Intel Core i3-7100U Processor (3M Cache, 2.40 GHz)
- Intel Core i3-7101E Processor (3M Cache, 3.90 GHz)
- Intel Core i3-7101TE Processor (3M Cache, 3.40 GHz)
- Intel Core i3-7102E Processor (3M Cache, 2.10 GHz)
- Intel Core i3-7130U Processor (3M Cache, 2.70 GHz)
- Intel Core i3-7167U Processor (3M Cache, 2.80 GHz)
- Intel Core i3-7300 Processor (4M Cache, 4.00 GHz)
- Intel Core i3-7300T Processor (4M Cache, 3.50 GHz)
- Intel Core i3-7320 Processor (4M Cache, 4.10 GHz)
- Intel Core i3-7350K Processor (4M Cache, 4.20 GHz)
- Intel Core i3-8100 Processor (6M Cache, 3.60 GHz)
- Intel Core i3-8100B Processor (4M Cache, 3.60 GHz)
- Intel Core i3-8100H Processor (6M Cache, 3.00 GHz)
- Intel Core i3-8100T Processor (6M Cache, 3.10 GHz)
- Intel Core i3-8109U Processor (4M Cache, up to 3.60 GHz)
- Intel Core i3-8121U Processor (4M Cache, up to 3.20 GHz)
- Intel Core i3-8130U Processor (4M Cache, up to 3.40 GHz)
- Intel Core i3-8145U Processor (4M Cache, up to 3.90 GHz)
- Intel Core i3-8300 Processor (8M Cache, 3.70 GHz)
- Intel Core i3-8300T Processor (8M Cache, 3.20 GHz)
- Intel Core i3-8350K Processor (8M Cache, 4.00 GHz)
- Intel Core i3-9100 Processor (6M Cache, up to 4.20 GHz)
- Intel Core i3-9100E Processor (6M Cache, up to 3.70 GHz)
- Intel Core i3-9100HL Processor (6M Cache, up to 2.90 GHz)
- Intel Core i3-9100T Processor (6M Cache, up to 3.70 GHz)
- Intel Core i3-9100TE Processor (6M Cache, up to 3.20 GHz)
- Intel Core i3-9300 Processor (8M Cache, up to 4.30 GHz)
- Intel Core i3-9300T Processor (8M Cache, up to 3.80 GHz)
- Intel Core i3-9320 Processor (8M Cache, up to 4.40 GHz)
- Intel Core i3-9350K Processor (8M Cache, up to 4.60 GHz)
- Intel Core i5+8400 Processor (9M Cache, up to 4.00 GHz) includes Intel Optane Memory (16GB)
- Intel Core i5+8500 Processor (9M Cache, up to 4.10 GHz) includes Intel Optane Memory (16GB)
- Intel Core i5-10210U Processor (6M Cache, up to 4.10 GHz)
- Intel Core i5-6198DU Processor (3M Cache, up to 2.80 GHz)
- Intel Core i5-6200U Processor (3M Cache, up to 2.80 GHz)
- Intel Core i5-6260U Processor (4M Cache, up to 2.90 GHz)
- Intel Core i5-6267U Processor (4M Cache, up to 3.30 GHz)
- Intel Core i5-6287U Processor (4M Cache, up to 3.50 GHz)
- Intel Core i5-6300HQ Processor (6M Cache, up to 3.20 GHz)
- Intel Core i5-6300U Processor (3M Cache, up to 3.00 GHz)
- Intel Core i5-6350HQ Processor (6M Cache, up to 3.20 GHz)
- Intel Core i5-6360U Processor (4M Cache, up to 3.10 GHz)
- Intel Core i5-6400 Processor (6M Cache, up to 3.30 GHz)
- Intel Core i5-6400T Processor (6M Cache, up to 2.80 GHz)
- Intel Core i5-6402P Processor (6M Cache, up to 3.40 GHz)
- Intel Core i5-6440EQ Processor (6M Cache, up to 3.40 GHz)
- Intel Core i5-6440HQ Processor (6M Cache, up to 3.50 GHz)
- Intel Core i5-6442EQ Processor (6M Cache, up to 2.70 GHz)
- Intel Core i5-6500 Processor (6M Cache, up to 3.60 GHz)
- Intel Core i5-6500T Processor (6M Cache, up to 3.10 GHz)
- Intel Core i5-6500TE Processor (6M Cache, up to 3.30 GHz)
- Intel Core i5-6585R Processor (6M Cache, up to 3.60 GHz)
- Intel Core i5-6600 Processor (6M Cache, up to 3.90 GHz)
- Intel Core i5-6600K Processor (6M Cache, up to 3.90 GHz)
- Intel Core i5-6600T Processor (6M Cache, up to 3.50 GHz)
- Intel Core i5-6685R Processor (6M Cache, up to 3.80 GHz)
- Intel Core i5-7200U Processor (3M Cache, up to 3.10 GHz)
- Intel Core i5-7260U Processor (4M Cache, up to 3.40 GHz)
- Intel Core i5-7267U Processor (4M Cache, up to 3.50 GHz)
- Intel Core i5-7287U Processor (4M Cache, up to 3.70 GHz)
- Intel Core i5-7300HQ Processor (6M Cache, up to 3.50 GHz)
- Intel Core i5-7300U Processor (3M Cache, up to 3.50 GHz)
- Intel Core i5-7360U Processor (4M Cache, up to 3.60 GHz)
- Intel Core i5-7400 Processor (6M Cache, up to 3.50 GHz)
- Intel Core i5-7400T Processor (6M Cache, up to 3.00 GHz)
- Intel Core i5-7440EQ Processor (6M Cache, up to 3.60 GHz)
- Intel Core i5-7440HQ Processor (6M Cache, up to 3.80 GHz)
- Intel Core i5-7442EQ Processor (6M Cache, up to 2.90 GHz)
- Intel Core i5-7500 Processor (6M Cache, up to 3.80 GHz)
- Intel Core i5-7500T Processor (6M Cache, up to 3.30 GHz)
- Intel Core i5-7600 Processor (6M Cache, up to 4.10 GHz)
- Intel Core i5-7600K Processor (6M Cache, up to 4.20 GHz)
- Intel Core i5-7600T Processor (6M Cache, up to 3.70 GHz)
- Intel Core i5-7Y54 Processor (4M Cache, up to 3.20 GHz)
- Intel Core i5-7Y57 Processor (4M Cache, up to 3.30 GHz)
- Intel Core i5-8200Y Processor (4M Cache, up to 3.90 GHz)
- Intel Core i5-8210Y Processor (4M Cache, up to 3.60 GHz)
- Intel Core i5-8250U Processor (6M Cache, up to 3.40 GHz)
- Intel Core i5-8259U Processor (6M Cache, up to 3.80 GHz)
- Intel Core i5-8265U Processor (6M Cache, up to 3.90 GHz)
- Intel Core i5-8269U Processor (6M Cache, up to 4.20 GHz)
- Intel Core i5-8300H Processor (8M Cache, up to 4.00 GHz)
- Intel Core i5-8305G Processor with Radeon Pro WX Vega M GL graphics (6M Cache, up to 3.80 GHz)
- Intel Core i5-8305G Processor with Radeon RX Vega M GL graphics (6M Cache, up to 3.80 GHz)
- Intel Core i5-8350U Processor (6M Cache, up to 3.60 GHz)
- Intel Core i5-8400 Processor (9M Cache, up to 4.00 GHz)
- Intel Core i5-8400B Processor (9M Cache, up to 4.00 GHz)
- Intel Core i5-8400H Processor (8M Cache, up to 4.20 GHz)
- Intel Core i5-8400T Processor (9M Cache, up to 3.30 GHz)
- Intel Core i5-8500 Processor (9M Cache, up to 4.10 GHz)
- Intel Core i5-8500B Processor (9M Cache, up to 4.10 GHz)
- Intel Core i5-8500T Processor (9M Cache, up to 3.50 GHz)
- Intel Core i5-8600 Processor (9M Cache, up to 4.30 GHz)
- Intel Core i5-8600K Processor (9M Cache, up to 4.30 GHz)
- Intel Core i5-8600T Processor (9M Cache, up to 3.70 GHz)
- Intel Core i5-9300H Processor (8M Cache, up to 4.10 GHz)
- Intel Core i5-9400 Processor (9M Cache, up to 4.10 GHz)
- Intel Core i5-9400H Processor (8M Cache, up to 4.30 GHz)
- Intel Core i5-9400T Processor (9M Cache, up to 3.40 GHz)
- Intel Core i5-9500 Processor (9M Cache, up to 4.40 GHz)
- Intel Core i5-9500E Processor (9M Cache, up to 4.20 GHz)
- Intel Core i5-9500T Processor (9M Cache, up to 3.70 GHz)
- Intel Core i5-9500TE Processor (9M Cache, up to 3.60 GHz)
- Intel Core i5-9600 Processor (9M Cache, up to 4.60 GHz)
- Intel Core i5-9600K Processor (9M Cache, up to 4.60 GHz)
- Intel Core i5-9600T Processor (9M Cache, up to 3.90 GHz)
- Intel Core i7+8700 Processor (12M Cache, up to 4.60 GHz) includes Intel Optane Memory (16GB)
- Intel Core i7-10510U Processor (8M Cache, up to 4.80 GHz)
- Intel Core i7-10710U Processor (12M Cache, up to 4.7 GHz)
- Intel Core i7-6498DU Processor (4M Cache, up to 3.10 GHz)
- Intel Core i7-6500U Processor (4M Cache, up to 3.10 GHz)
- Intel Core i7-6560U Processor (4M Cache, up to 3.20 GHz)
- Intel Core i7-6567U Processor (4M Cache, up to 3.60 GHz)
- Intel Core i7-6600U Processor (4M Cache, up to 3.40 GHz)
- Intel Core i7-6650U Processor (4M Cache, up to 3.40 GHz)
- Intel Core i7-6660U Processor (4M Cache, up to 3.40 GHz)
- Intel Core i7-6700 Processor (8M Cache, up to 4.00 GHz)
- Intel Core i7-6700HQ Processor (6M Cache, up to 3.50 GHz)
- Intel Core i7-6700K Processor (8M Cache, up to 4.20 GHz)
- Intel Core i7-6700T Processor (8M Cache, up to 3.60 GHz)
- Intel Core i7-6700TE Processor (8M Cache, up to 3.40 GHz)
- Intel Core i7-6770HQ Processor (6M Cache, up to 3.50 GHz)
- Intel Core i7-6785R Processor (8M Cache, up to 3.90 GHz)
- Intel Core i7-6820EQ Processor (8M Cache, up to 3.50 GHz)
- Intel Core i7-6820HK Processor (8M Cache, up to 3.60 GHz)
- Intel Core i7-6820HQ Processor (8M Cache, up to 3.60 GHz)
- Intel Core i7-6822EQ Processor (8M Cache, up to 2.80 GHz)
- Intel Core i7-6870HQ Processor (8M Cache, up to 3.60 GHz)
- Intel Core i7-6920HQ Processor (8M Cache, up to 3.80 GHz)
- Intel Core i7-6970HQ Processor (8M Cache, up to 3.70 GHz)
- Intel Core i7-7500U Processor (4M Cache, up to 3.50 GHz )
- Intel Core i7-7560U Processor (4M Cache, up to 3.80 GHz)
- Intel Core i7-7567U Processor (4M Cache, up to 4.00 GHz)
- Intel Core i7-7600U Processor (4M Cache, up to 3.90 GHz)
- Intel Core i7-7660U Processor (4M Cache, up to 4.00 GHz)
- Intel Core i7-7700 Processor (8M Cache, up to 4.20 GHz)
- Intel Core i7-7700HQ Processor (6M Cache, up to 3.80 GHz)
- Intel Core i7-7700K Processor (8M Cache, up to 4.50 GHz)
- Intel Core i7-7700T Processor (8M Cache, up to 3.80 GHz)
- Intel Core i7-7820EQ Processor (8M Cache, up to 3.70 GHz)
- Intel Core i7-7820HK Processor (8M Cache, up to 3.90 GHz)
- Intel Core i7-7820HQ Processor (8M Cache, up to 3.90 GHz)
- Intel Core i7-7920HQ Processor (8M Cache, up to 4.10 GHz)
- Intel Core i7-7Y75 Processor (4M Cache, up to 3.60 GHz)
- Intel Core i7-8086K Processor (12M Cache, up to 5.00 GHz)
- Intel Core i7-8500Y Processor (4M Cache, up to 4.20 GHz)
- Intel Core i7-8550U Processor (8M Cache, up to 4.00 GHz)
- Intel Core i7-8559U Processor (8M Cache, up to 4.50 GHz)
- Intel Core i7-8565U Processor (8M Cache, up to 4.60 GHz)
- Intel Core i7-8650U Processor (8M Cache, up to 4.20 GHz)
- Intel Core i7-8700 Processor (12M Cache, up to 4.60 GHz)
- Intel Core i7-8700B Processor (12M Cache, up to 4.60 GHz)
- Intel Core i7-8700K Processor (12M Cache, up to 4.70 GHz)
- Intel Core i7-8700T Processor (12M Cache, up to 4.00 GHz)
- Intel Core i7-8705G Processor with Radeon RX Vega M GL graphics (8M Cache, up to 4.10 GHz)
- Intel Core i7-8706G Processor with Radeon Pro WX Vega M GL graphics (8M Cache, up to 4.10 GHz)
- Intel Core i7-8706G Processor with Radeon RX Vega M GL graphics (8M Cache, up to 4.10 GHz)
- Intel Core i7-8709G Processor with Radeon RX Vega M GH graphics (8M Cache, up to 4.10 GHz)
- Intel Core i7-8750H Processor (9M Cache, up to 4.10 GHz)
- Intel Core i7-8809G Processor with Radeon RX Vega M GH graphics (8M Cache, up to 4.20 GHz)
- Intel Core i7-8850H Processor (9M Cache, up to 4.30 GHz)
- Intel Core i7-9700 Processor (12M Cache, up to 4.70 GHz)
- Intel Core i7-9700E Processor (12M Cache, up to 4.40 GHz)
- Intel Core i7-9700K Processor (12M Cache, up to 4.90 GHz)
- Intel Core i7-9700T Processor (12M Cache, up to 4.30 GHz)
- Intel Core i7-9700TE Processor (12M Cache, up to 3.80 GHz)
- Intel Core i7-9750H Processor (12M Cache, up to 4.50 GHz)
- Intel Core i7-9850H Processor (12M Cache, up to 4.60 GHz)
- Intel Core i7-9850HE Processor (9M Cache, up to 4.40 GHz)
- Intel Core i7-9850HL Processor (9M Cache, up to 4.10 GHz)
- Intel Core i9-8950HK Processor (12M Cache, up to 4.80 GHz)
- Intel Core i9-9900K Processor (16M Cache, up to 5.00 GHz)
- Intel Core m3-6Y30 Processor (4M Cache, up to 2.20 GHz)
- Intel Core m3-7Y30 Processor (4M Cache, 2.60 GHz )
- Intel Core m3-7Y32 Processor (4M Cache, up to 3.00 GHz)
- Intel Core m3-8100Y Processor (4M Cache, up to 3.40 GHz)
- Intel Core m5-6Y54 Processor (4M Cache, up to 2.70 GHz)
- Intel Core m5-6Y57 Processor (4M Cache, up to 2.80 GHz)
- Intel Core m7-6Y75 Processor (4M Cache, up to 3.10 GHz)
- Intel HD Graphics 500
- Intel HD Graphics 505
- Intel HD Graphics 510
- Intel HD Graphics 515
- Intel HD Graphics 520
- Intel HD Graphics 530
- Intel HD Graphics 610
- Intel HD Graphics 615
- Intel HD Graphics 620
- Intel HD Graphics 630
- Intel HD Graphics for 6th Generation Intel Processors
- Intel HD Graphics P530
- Intel HD Graphics P630
- Intel Iris Graphics 540
- Intel Iris Graphics 550
- Intel Iris Plus Graphics 640
- Intel Iris Plus Graphics 645
- Intel Iris Plus Graphics 650
- Intel Iris Plus Graphics 655
- Intel Iris Pro Graphics 580
- Intel Iris Pro Graphics P580
- Intel UHD Graphics
- Intel UHD Graphics 600
- Intel UHD Graphics 605
- Intel UHD Graphics 610
- Intel UHD Graphics 615
- Intel UHD Graphics 617
- Intel UHD Graphics 620
- Intel UHD Graphics 630
- Intel UHD Graphics P630
- Intel Xeon Processor E3-1505L v5 (8M Cache, 2.00 GHz)
- Intel Xeon Processor E3-1505M v5 (8M Cache, 2.80 GHz)
- Intel Xeon Processor E3-1515M v5 (8M Cache, 2.80 GHz)
- Intel Xeon Processor E3-1535M v5 (8M Cache, 2.90 GHz)
- Intel Xeon Processor E3-1545M v5 (8M Cache, 2.90 GHz)
- Intel Xeon Processor E3-1558L v5 (8M Cache, 1.90 GHz)
- Intel Xeon Processor E3-1565L v5 (8M Cache, 2.50 GHz)
- Intel Xeon Processor E3-1575M v5 (8M Cache, 3.00 GHz)
- Intel Xeon Processor E3-1578L v5 (8M Cache, 2.00 GHz)
- Intel Xeon Processor E3-1585 v5 (8M Cache, 3.50 GHz)
- Intel Xeon Processor E3-1585L v5 (8M Cache, 3.00 GHz)
- Radeon Pro WX Vega M GL Graphics
- Radeon RX Vega M GH Graphics
- Radeon RX Vega M GL Graphics
Supported OS versions
- Microsoft Windows 10-64 - Fall Creators Update (1709)
- Microsoft Windows 10-64 - April 2018 Update (1803)
- Microsoft Windows 10-64 - October 2018 Update (1809)
Intel HD Graphics Driver 26.20.100.7158 for Windows 10 64-bit
Posted by : Admin
"Run as Administrator": What Does It Mean?
Why Do Some Programs Need to be Run as Administrator & What Happens When You Do?.
As a Pctoolsword reader you've surely opened software as an admin on Windows before -- maybe as recently as today -- so the function probably isn't foreign to you. However, we were curious to know more about what happens under the hood of Windows when you tell the operating system to run a program as an administrator, and why this process is necessary in the first place.
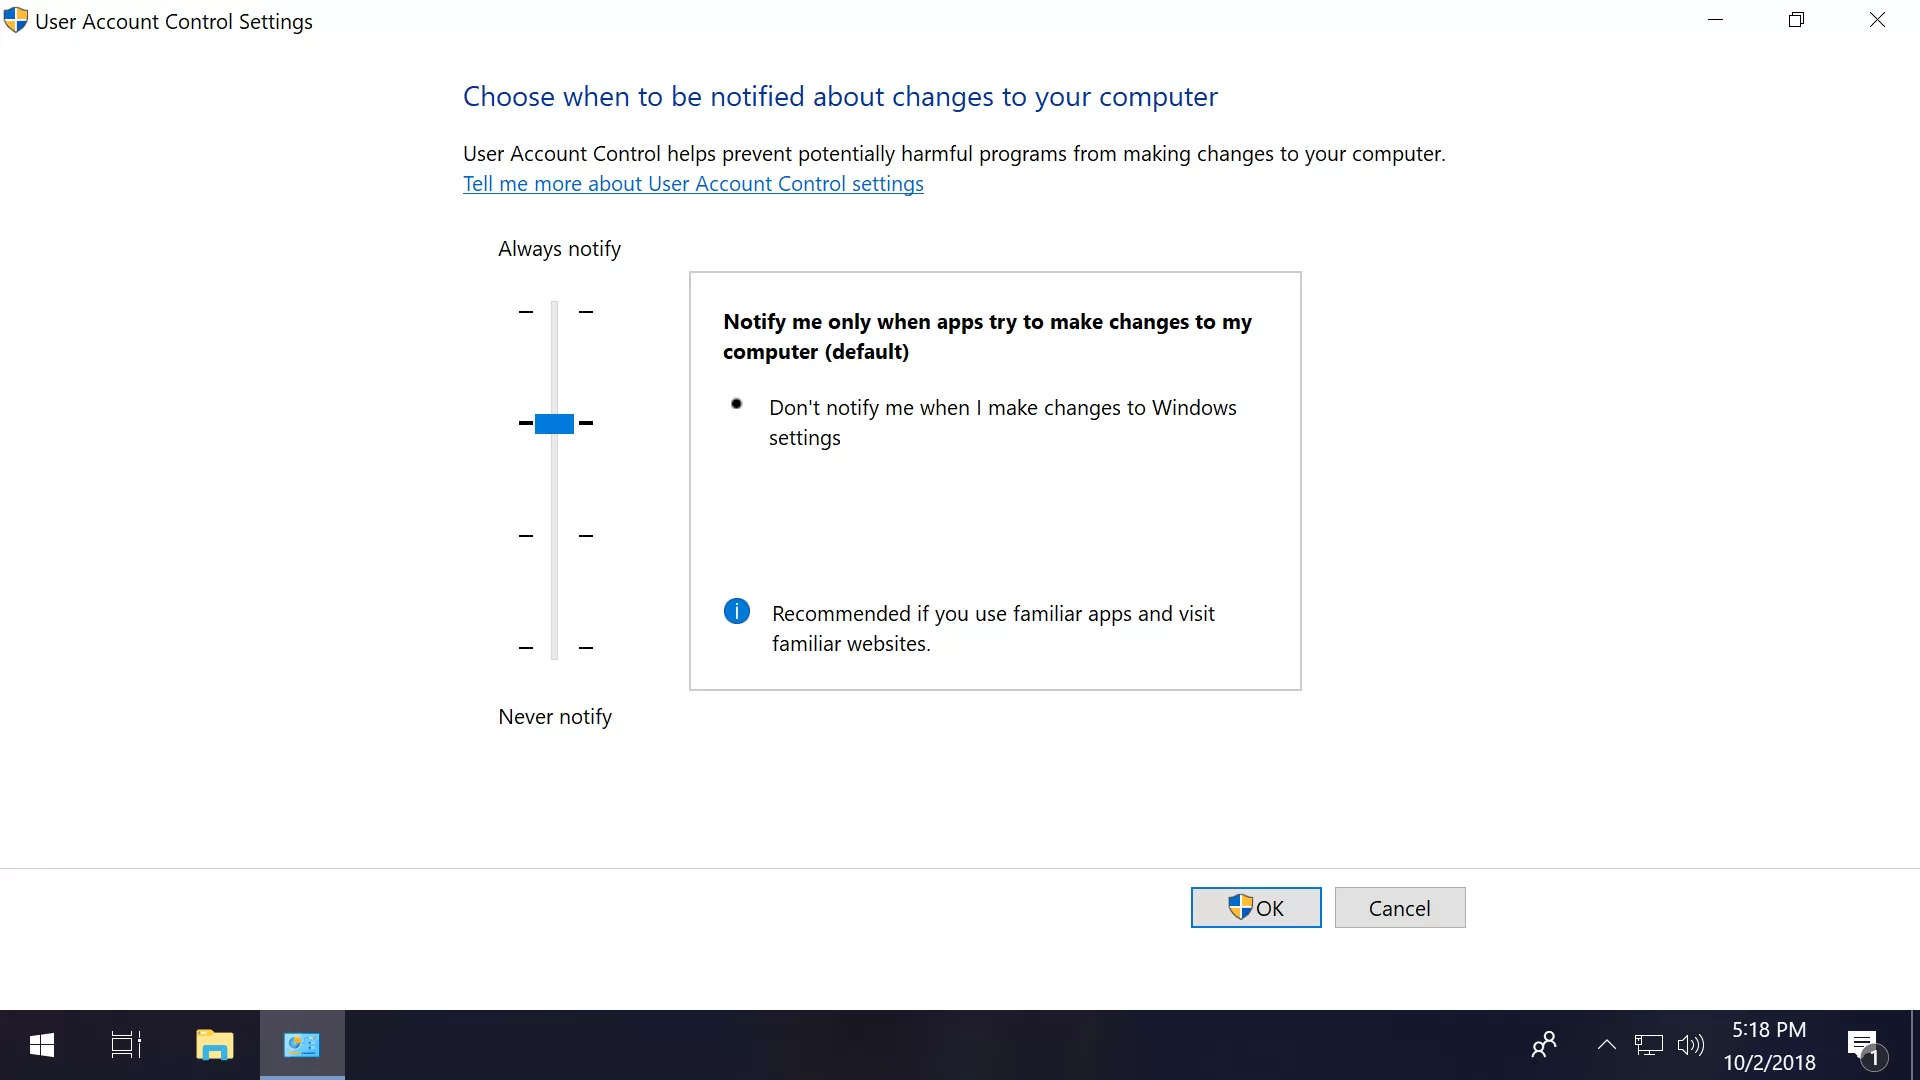
Those of you who made the transition from XP to Vista will probably remember the introduction of "User Access Control" (UAC) or "Mandatory Integrity Control" (MIC). The security feature, which remains part of Microsoft's OS, prompts you when software tries making changes to your system and rests at crux of why applications sometimes require "elevated" access.
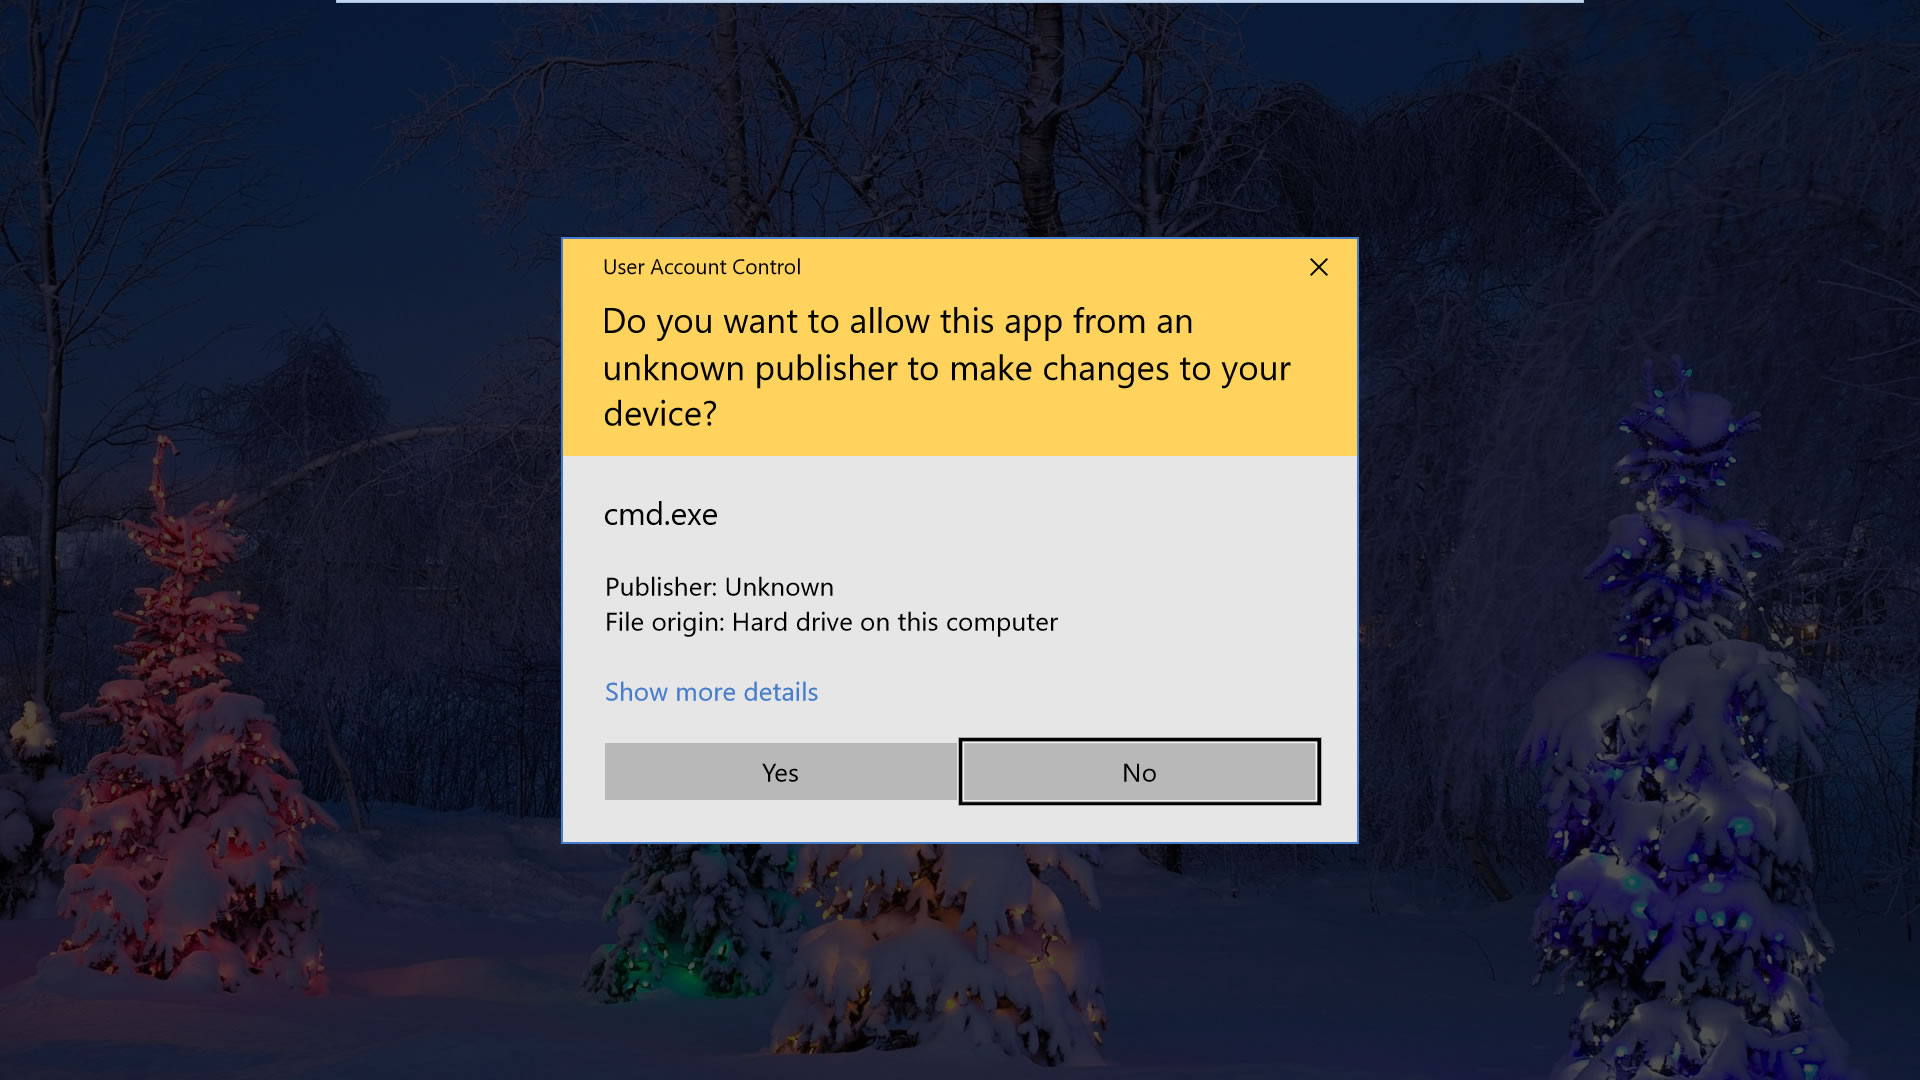
When you log in to Windows, your account is assigned a token that contains identifying information including your user groups and privileges such as read, write, and execute permissions.
Among the information in that token is an integrity level which is used by the operating system determine the trustworthiness of objects like files, registry keys for the purpose of informing users when installations are being launched as well as isolating processes from having unnecessary access to system files.
Editor's Note: This feature was originally published on October 8, 2018. It's just as relevant and current today as it was then, so we've bumped it as part of our #ThrowbackThursday initiative.
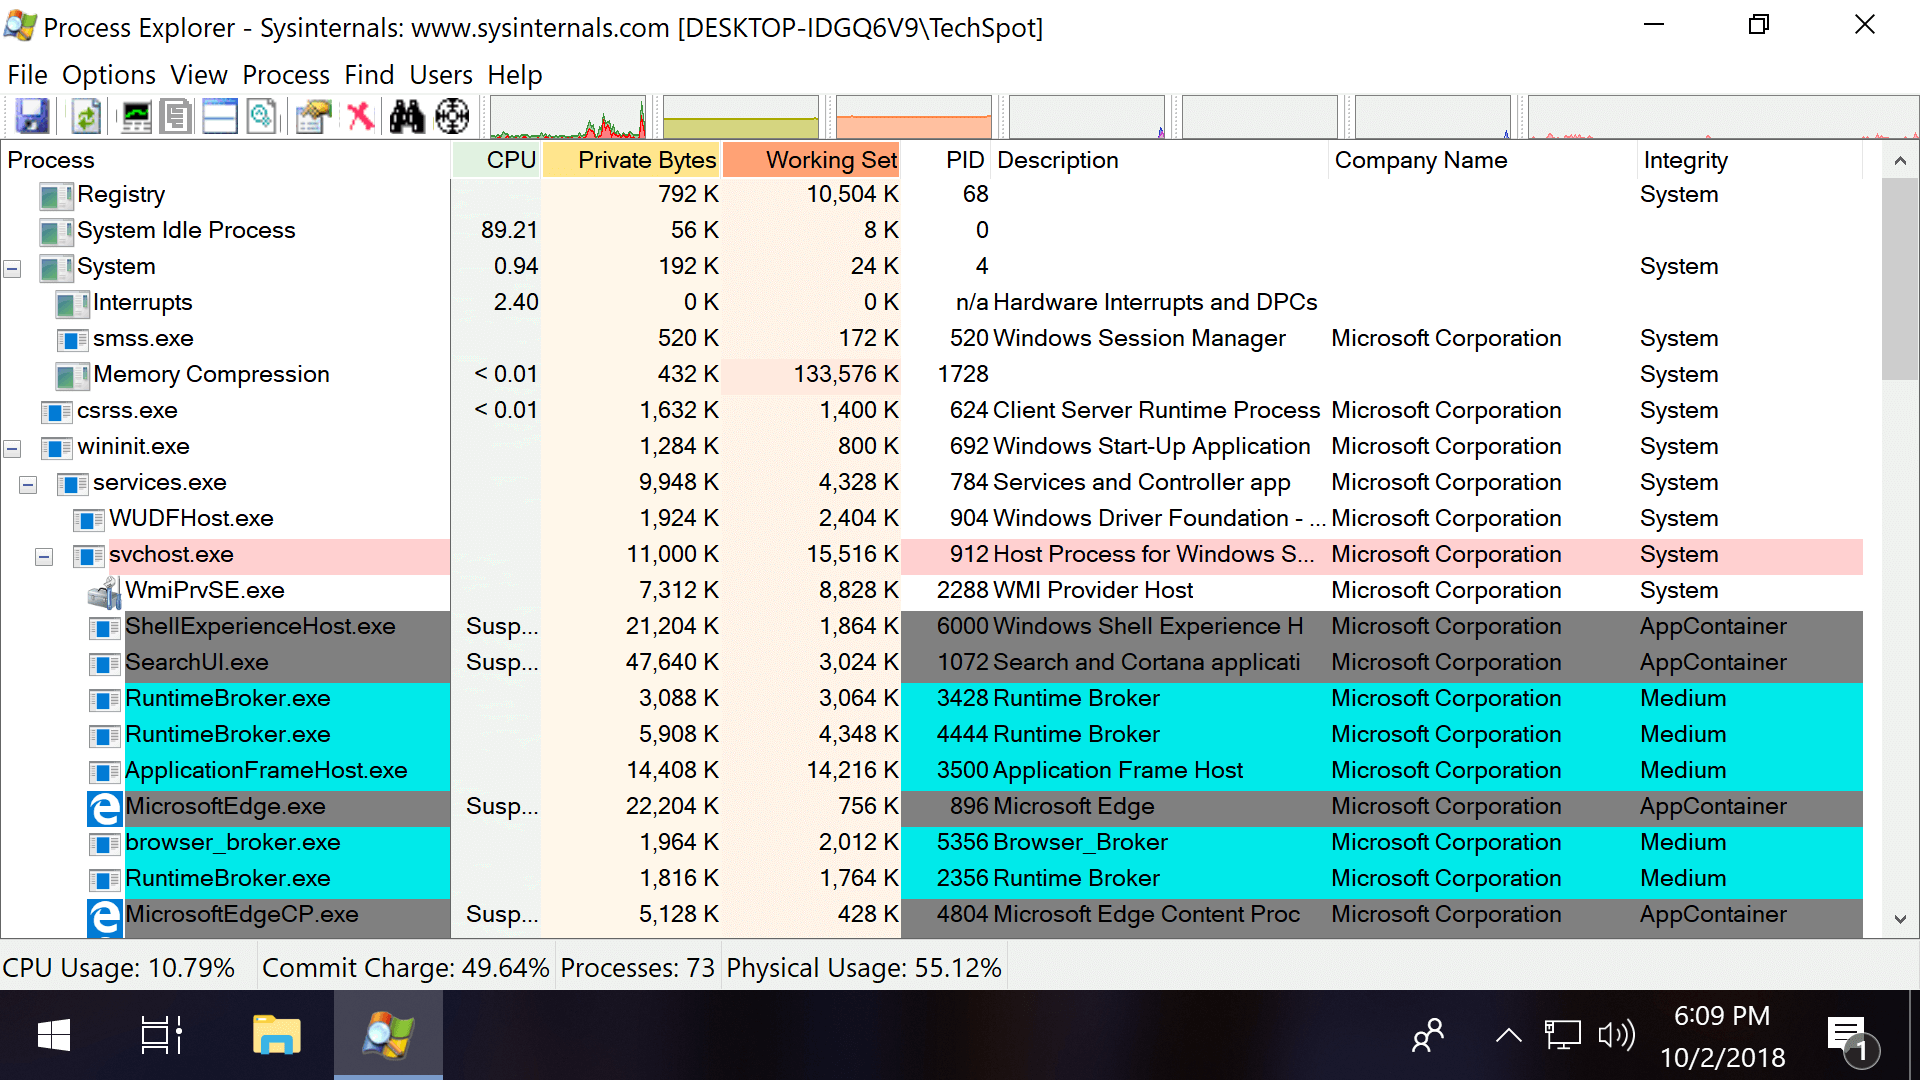
The Windows Mandatory Integrity Control (MIC) mechanism has at least six different integrity levels: untrusted, low, medium, high, system and trusted installer.
By default, a standard user account has a medium integrity, which is the maximum level available for a process to be created when you open an executable file without providing elevated access via admin credentials.
When you right-click on a file or program and choose "Run as administrator," that process (and only that process) is started with an administrator token, thus providing high integrity clearance for features that may require the additional access to your Windows files etc.
The different Windows integrity levels:
- Untrusted Integrity: Given to anonymous processes.
- Low Integrity: Commonly used for Web-facing software such as browsers.
- Medium Integrity: Applied to standard users and used for most objects.
- High Integrity: Administrator-level access, generally requires elevation.
- System Integrity: Reserved for the Windows kernel and core services.
- Trusted Installer: Used for Windows Updates and system components.
Processes started by opening an exe from a Windows account with medium clearance will have that integrity level unless the executable file is set to low, and developers are encouraged to use the lowest access possible, ideally avoiding instances where software will require high integrity to thwart unauthorized code (malware) from taking root.
The practice of "least-privilege" design is applied to Windows' own administrator accounts, which receive both standard and admin-level tokens upon logging in, using standard/medium integrity access when possible instead of high.
Although Microsoft recommends against running programs as an administrator and giving them high integrity access without a good reason, new data must be written to Program Files for an application to be installed which will always require admin access with UAC enabled, while software such as AutoHotkey scripts will often need elevated status to function properly.
Here are all the ways we could find to open executable files with administrator access (high integrity) on Windows 10, including some methods that will configure software to always open with elevated access:
Ways to run a program as an administrator on Windows
Starting with the most obvious: you can launch a program as an administrator by right-clicking on the executable file and choosing "Run as administrator."
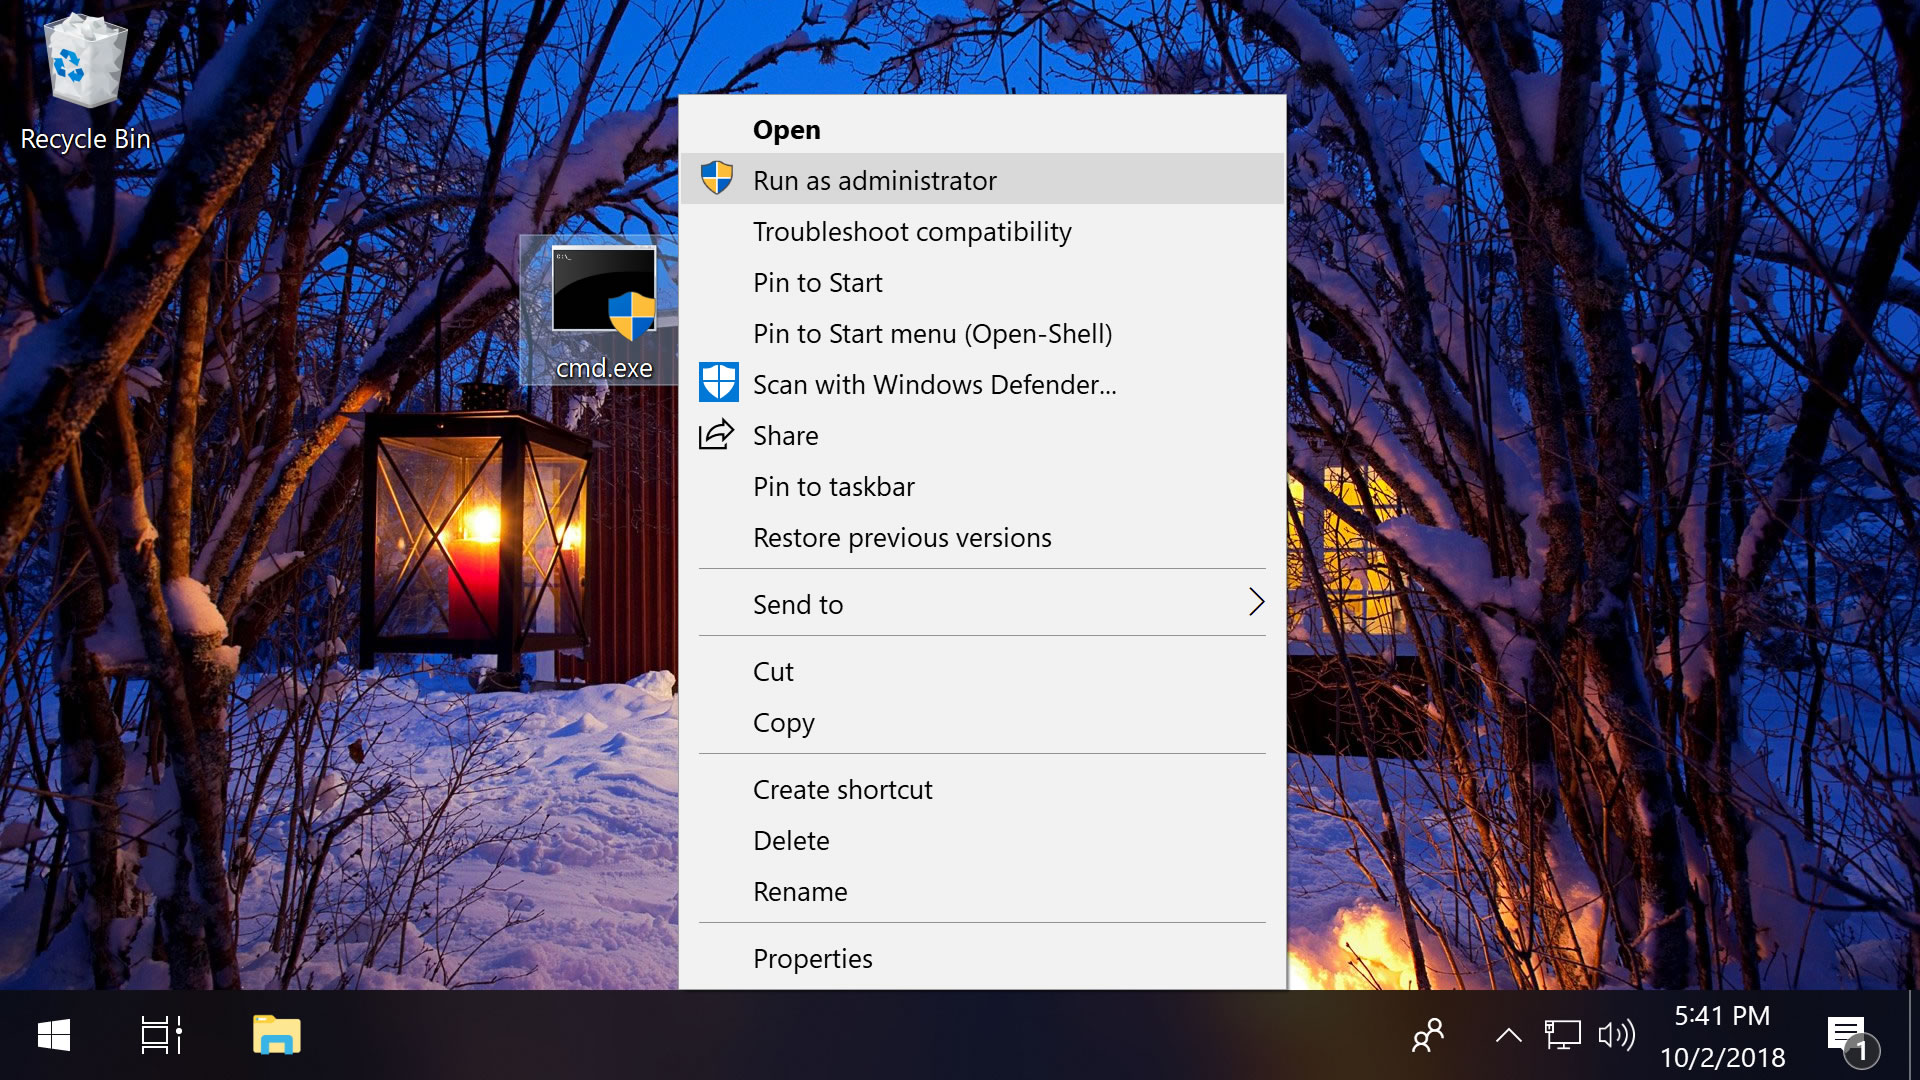
As a shortcut, holding Shift + Ctrl while double-clicking the file will also start the program as an admin.
Separately, holding only Shift while you right-click on the file will add "Run as a different user..." to the context menu, which opens a screen where you can enter another user's credentials, including the administrator account (the username is Administrator and may not have a password if you haven't applied one).
These locations also have shortcuts to admin access...
Start Menu: Right-click an executable like anywhere else for the option to launch a program as an administrator.
Taskbar: Click a program on your taskbar to open the jump list, then right-click the exe from that menu for the admin option.
File Explorer: Select the file in File Explorer > Click Manage in the Ribbon menu up top > Choose "Run as administrator."
Run prompt: Enter this line into Run (Windows key + R): RunAs.exe /user:Administrator "cmd.exe"
Command Prompt: From the command line, enter this with your file location: runas /user:administrator "C:\Users\TechSpot\Desktop\file.exe"
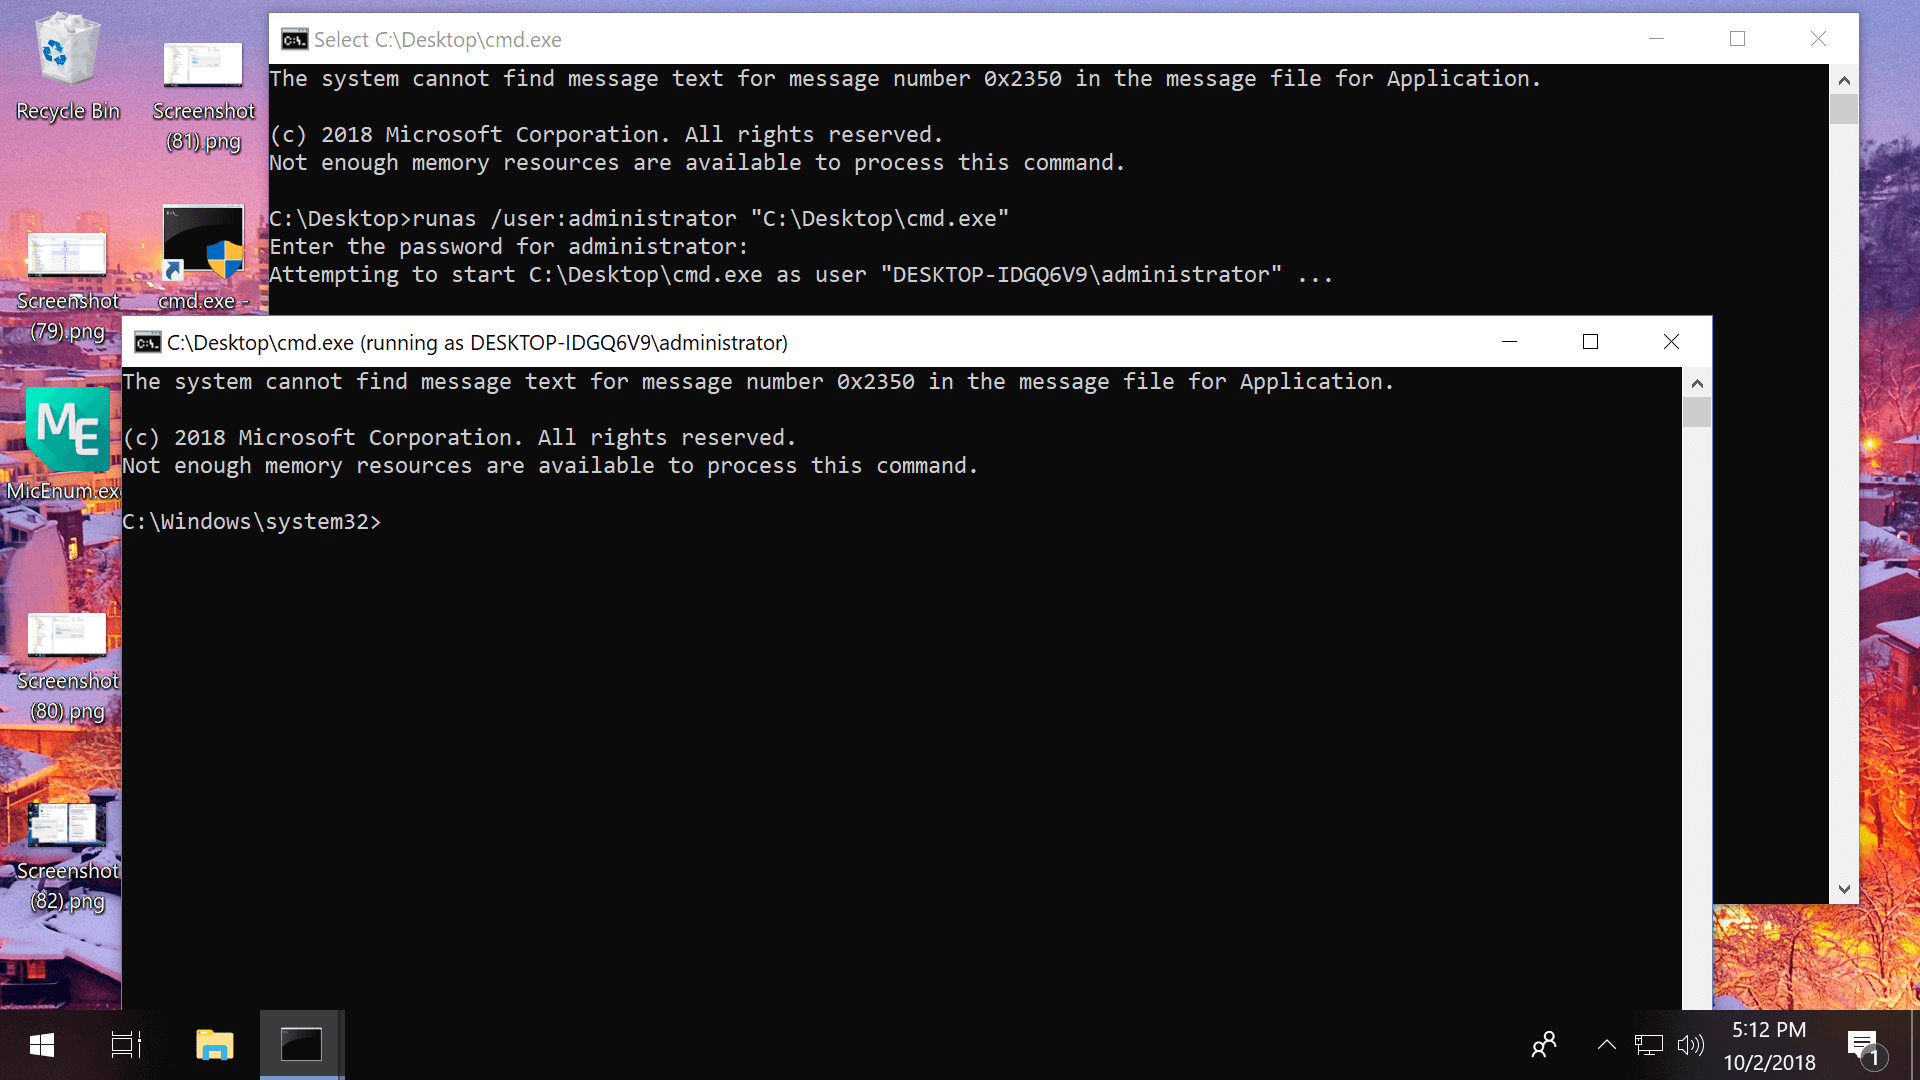
Task Manager: Click File > Run new task > Check the box next to "Create this task with administrative privileges" > Enter the location of your file (example: C:\Users\TechSpot\Desktop\file.exe)
Task Scheduler: When creating a new task (Action > Create Task), enable these settings in the "General" tab: "Run whether user is logged on or not" and "Run with highest privileges"
Note that the Command Prompt method didn't work until we enabled the Administrator account and changed another setting that would allow the command to be entered without a password:
- Search Start or Run for compmgmt.msc > Go to Local Users and Groups > Users > double-click on Administrator and uncheck "Account is disabled"
- Search Start or Run for gpedit.msc > Go to Computer Configuration > Windows Settings > Local Policies > Security Options > Double-click the option Accounts: Limit local account use of blank passwords to console logon online and choose Disable
Also, in the same section of the Group Policy Editor (gpedit.msc) that we just mentioned are a range of options to fine-tune Windows' User Account Control settings (scroll all the way down).
How to set programs so they always start as an admin
Given Microsoft's philosophy of providing programs with the least amount of access possible, configuring an application to always run as an administrator is generally not recommended but sometimes convenient when the software always requires elevation so you don't have to jump through those hoops every time. Here are a few ways to accomplish that:
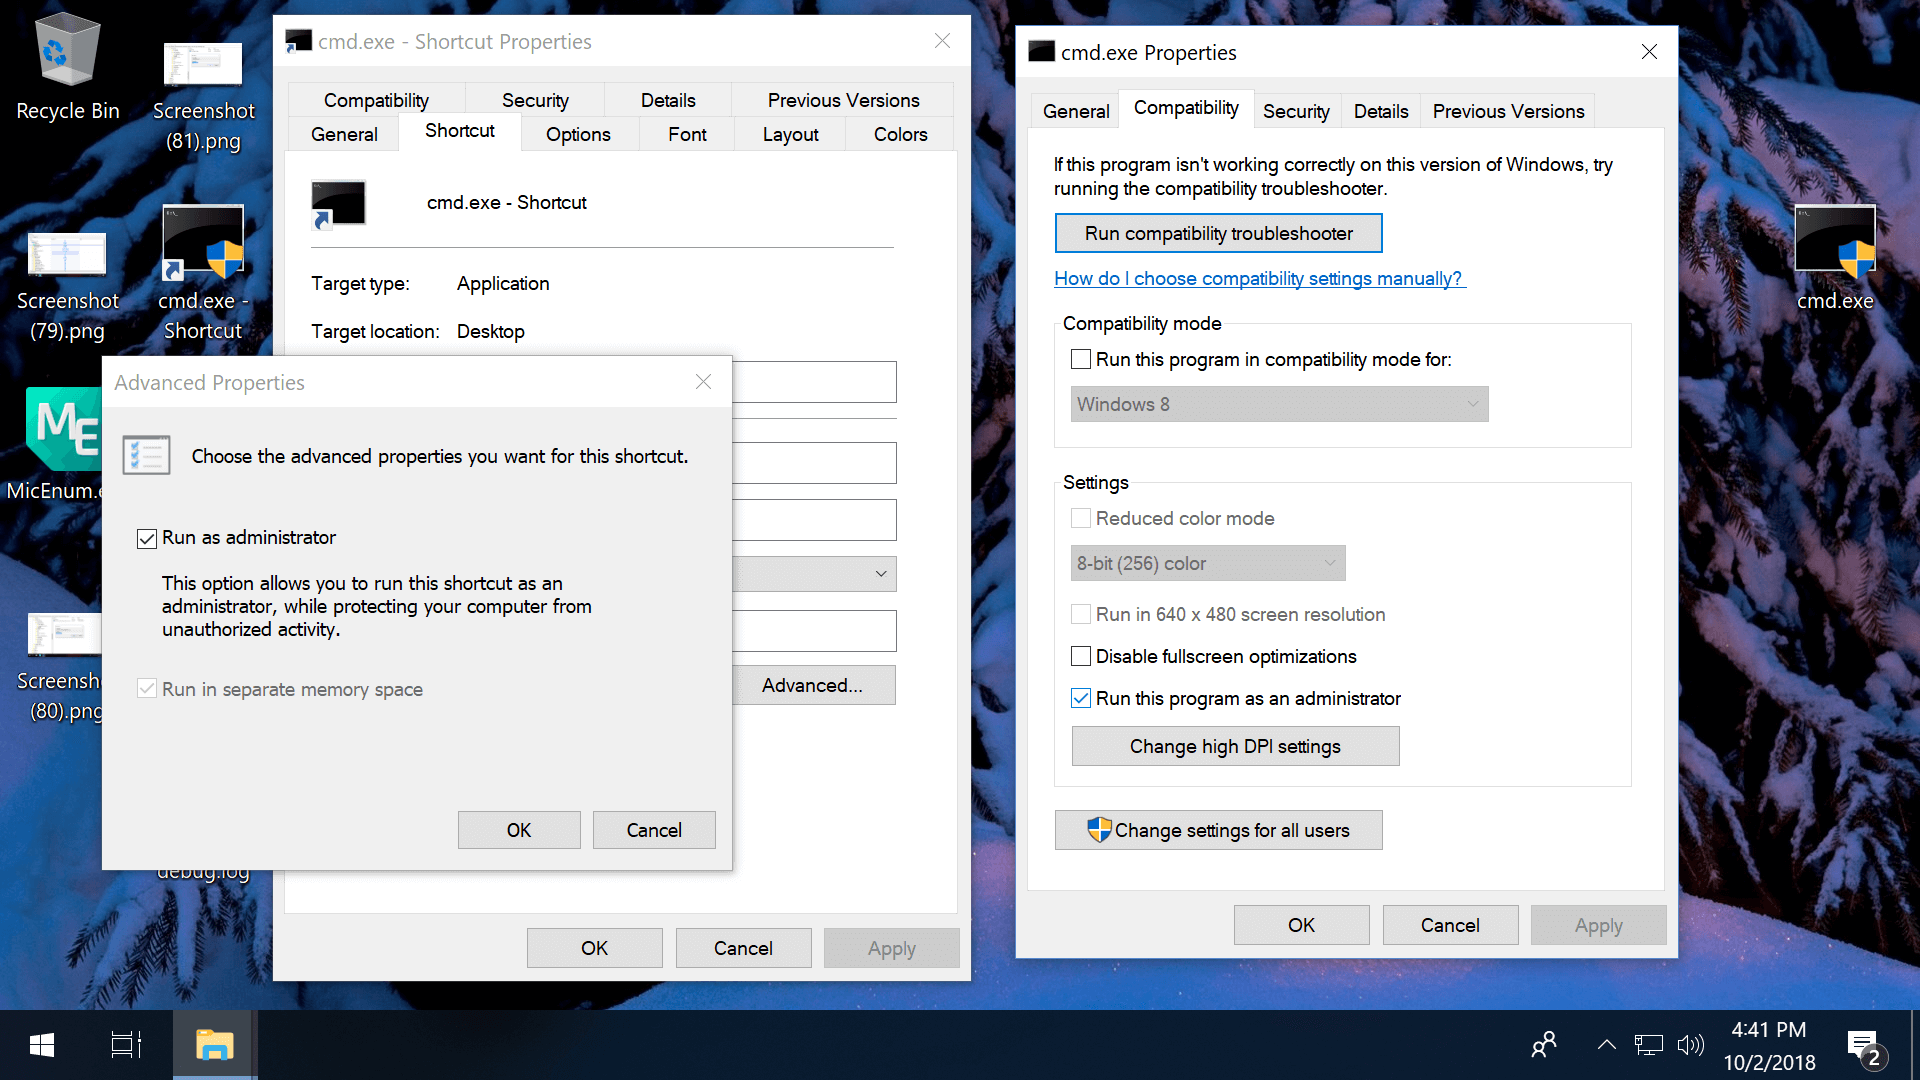
Always run as admin from a shortcut: Right-click on a shortcut file > Shortcut tab > Advanced > Check the box to "Run as administrator"
Note that you can create a shortcut file by right-clicking the main exe, and that if you copy the shortcut into C:\Users\TechSpot\AppData\Roaming\Microsoft\Windows\Start Menu\Programs\Startup the program will automatically start with Windows as you sign in.
Always run as admin via Compatibility Properties: Right-click on an exe > Properties > Compatibility tab > Check the box to "Run this program as an administrator."
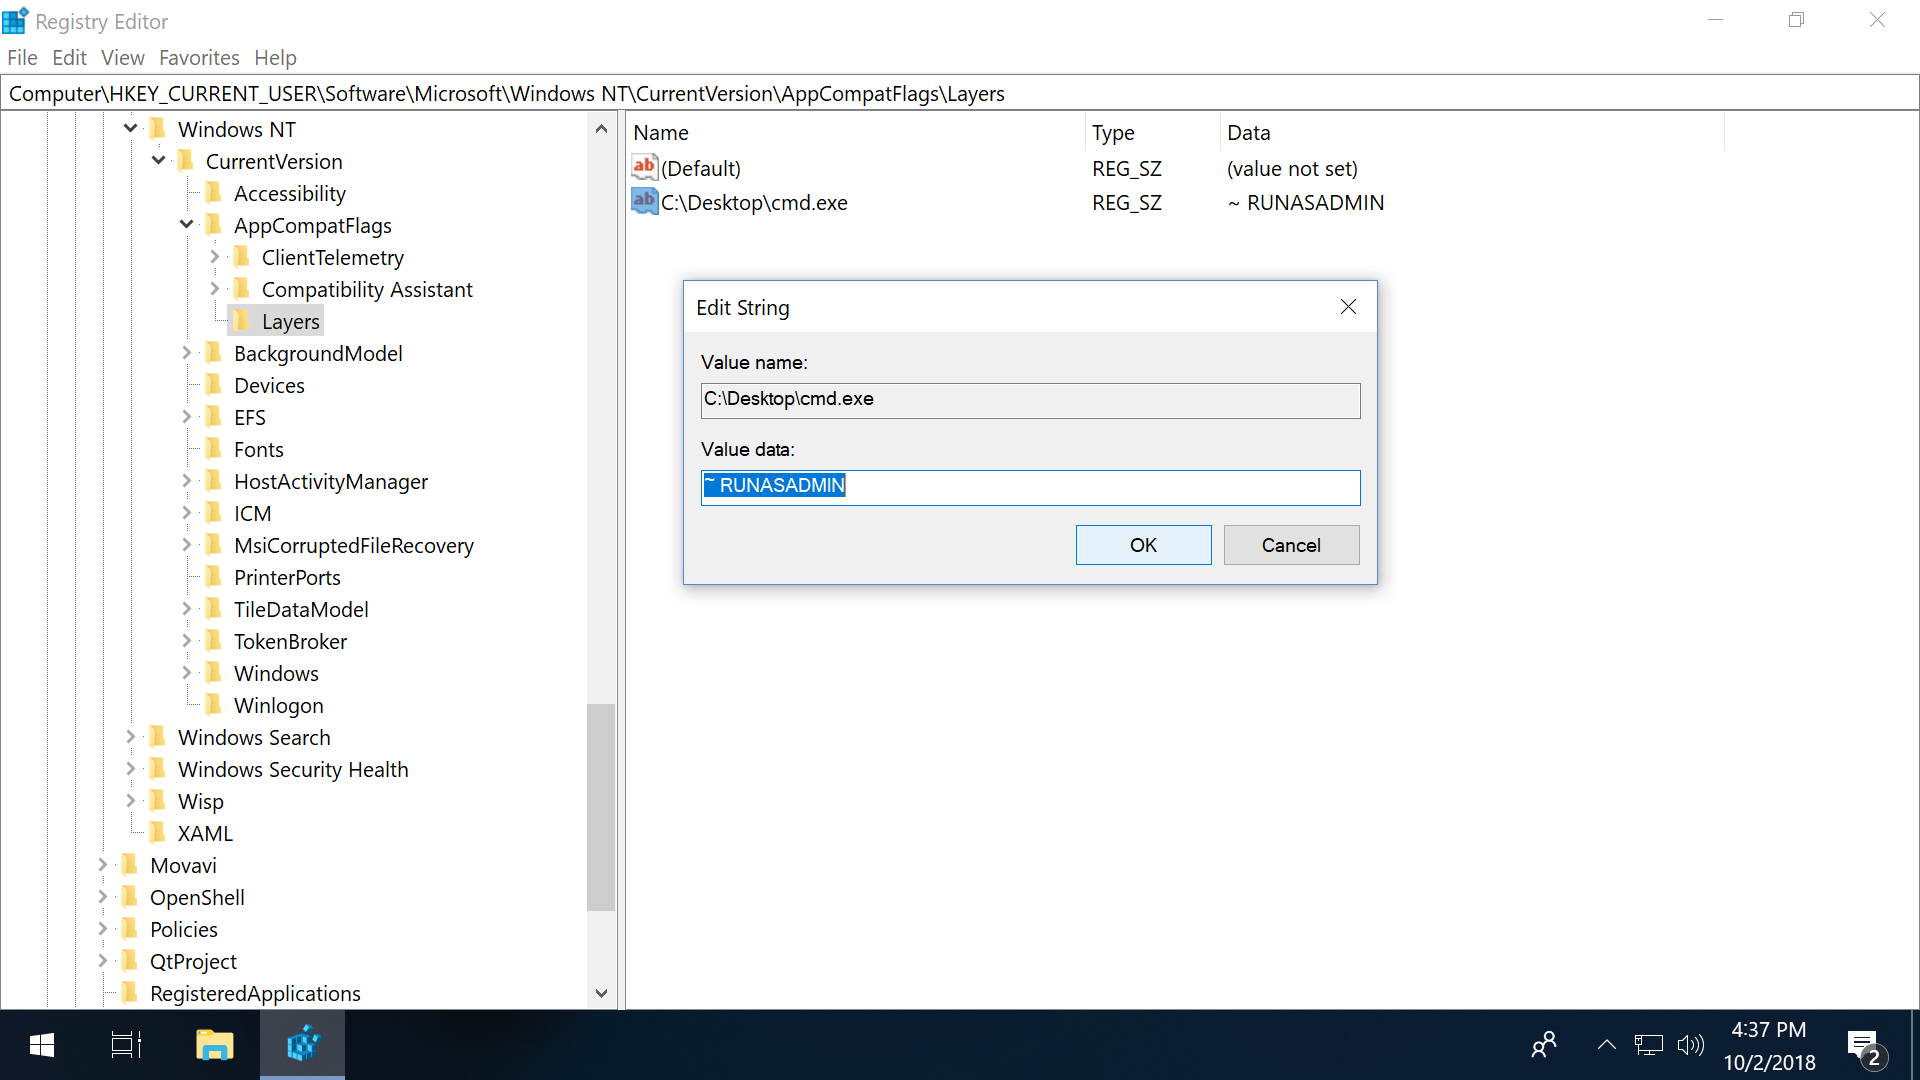
Always run as admin via the Registry Editor:
- Navigate to: HKEY_CURRENT_USER\Software\Microsoft\Windows NT\CurrentVersion\AppCompatFlags\Layers
- If "Layers" is missing, right-click AppCompatFlags and add a new key named Layers
- Right-click Layers (either the folder or in the right pane) an create a new String Value
- Set the value name as the full path of the exe file
- Set value data as ~ RUNASADMIN
Bonus
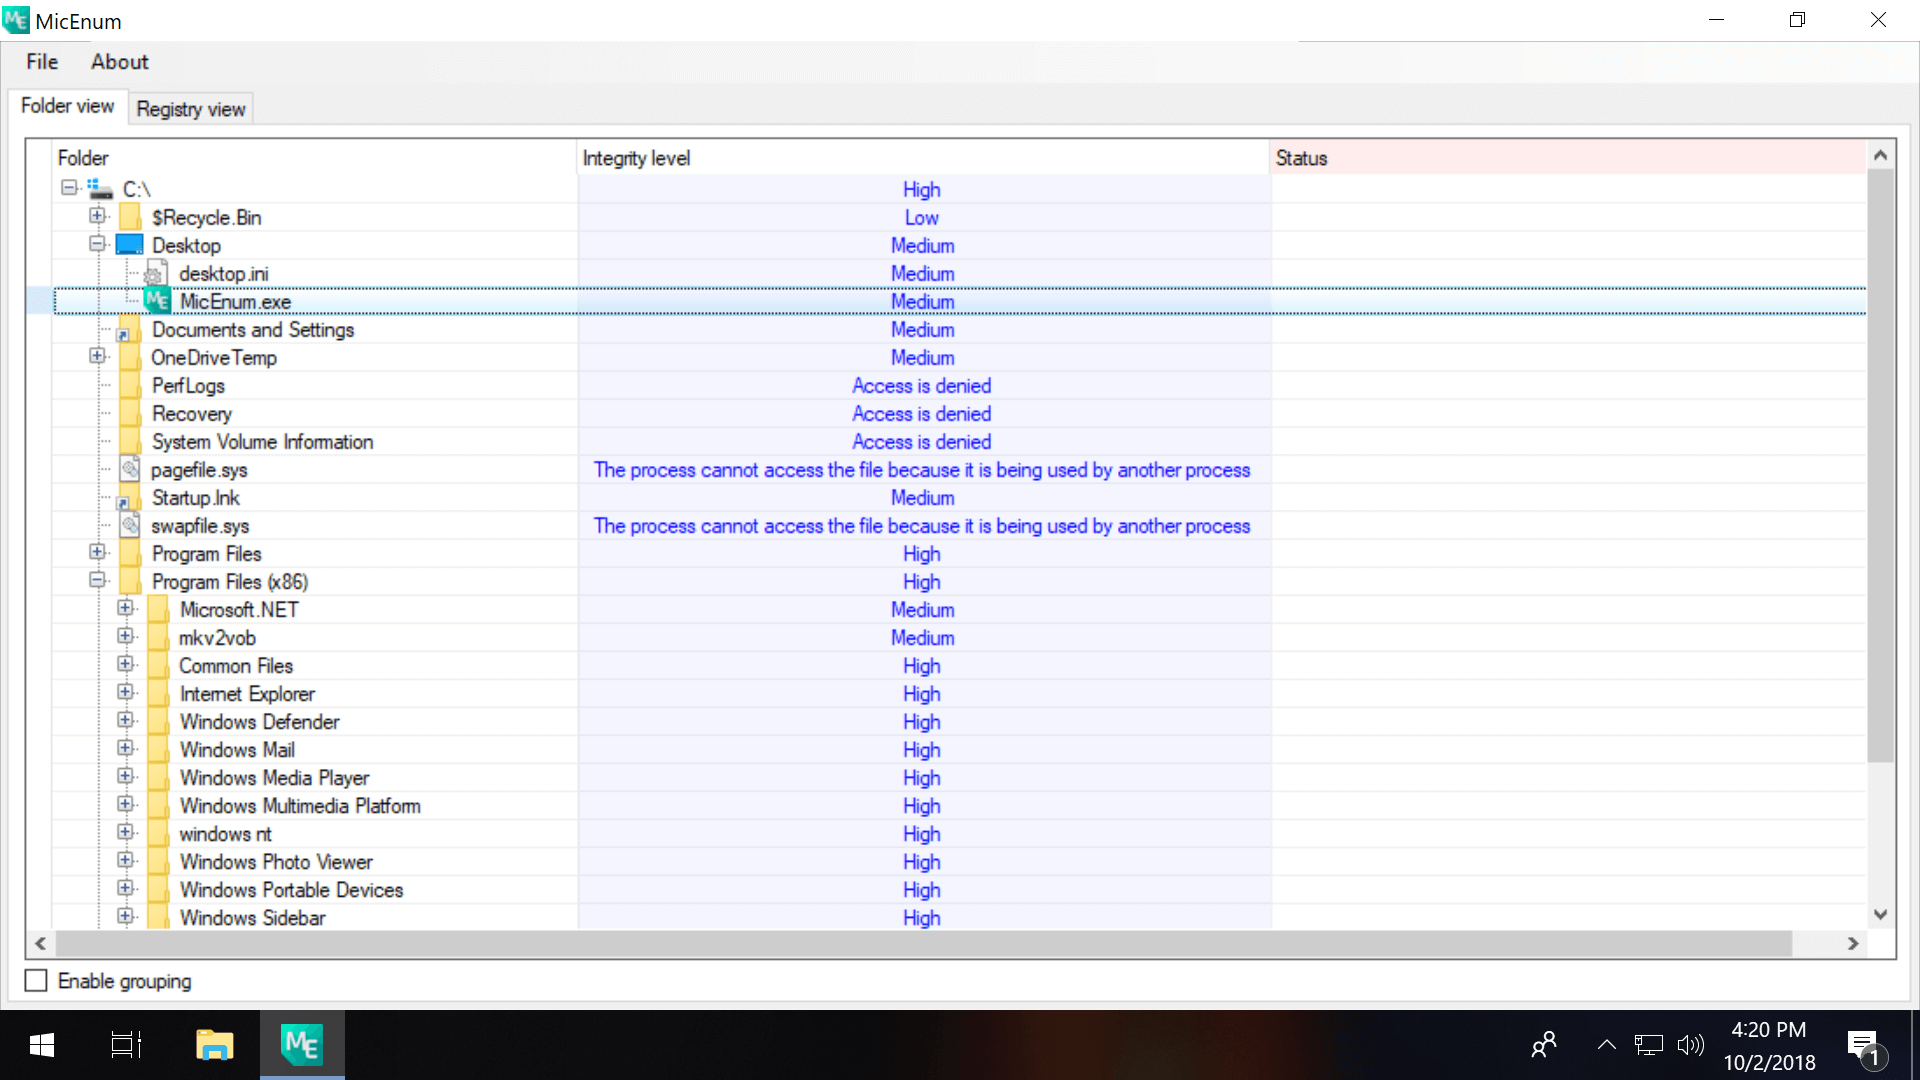
#1 Third-party software including MicEnum will generate a list of Windows files/folders and their integrity levels, including the ability to set a new integrity level as well as browse in both folder and registry views.
Process Explorer (pictured in the intro of this article) also has the ability to display integrity levels if you right click the horizontal bar with CPU, Private Bytes etc. and open the properties (check the box next to Integrity Levels).
#2 On a new Windows installation, the first user account created is a local administrator account while subsequent accounts are standard users. By default, the built-in administrator account is disabled. You can enable the account so it's available when you log in to Windows by entering this line into Command Prompt (use "no" to disable it again): net user administrator /active:yes
#3 Microsoft has different utilities such as Elevation PowerToys and PsExec which can also be used to gain administrator access but span beyond the scope of this guide.
"Run as Administrator": What Does It Mean?
Best WordPress hosting services 2020 in the table below. Logo Plan Price/ month Features Support View Full Review Basic $2.95/mo. 1...


